Cricut Family Sign
Cricut Project Ideas for the Home

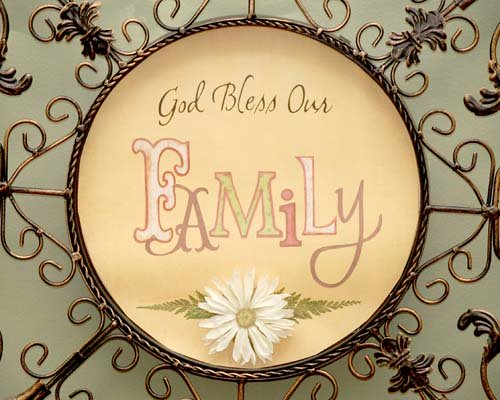
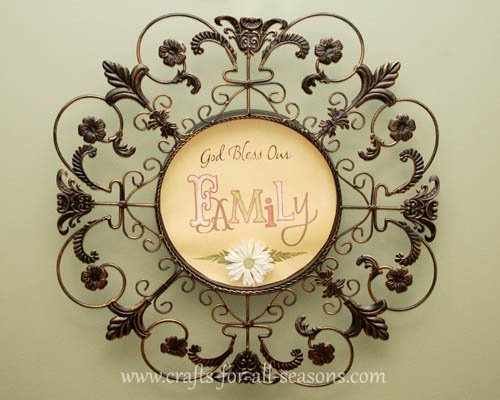
This Cricut Family Sign has a story behind it. It was originally a clock, which stopped working. When I went to remove the clock motor, I broke the hands off! Since the ornate frame was so pretty, I knew I wanted to do something with it.
I began searching for nice "Family" sayings and phrases, but quickly realized I didn't have enough room to work with. So I thought the simple "God Bless Our Family" would be perfect. This hangs over our front door in our main entrance. It was so easy, but took a bit of planning time.
To make a Cricut family sign of your own, you can use any type of frame, and you don't necessarily have to use the cartridges I did. To achieve the look, you just want to use a few different fonts from various cartridges you may own. Cut each letter out first on cheap paper and try out different sizes, to figure out what works best together. I wrote the size right on the letter I cut on my scrap paper so it would be easy to remember. Then, just pick different colored papers that work together well. This is especially easy to do if you use papers from a coordinating pad. You could also use chipboard to make these letters 3D, which would look really nice. Or you can try those pop dots to raise the letters.
For some of the letters I inked around the edges using a stamp pad. Some letters I created a shadow (if it was available for the particular letter). The embellishment at the bottom is a real silk flower I glued in place, with some real pressed fern.
Cartridges Used to Make this Cricut Family Sign (or use any font cartridge YOU have):
- Platin SchoolBook Cartridge
- Storybook Cartridge
- Alphalicious Cartridge
- Calligraphy Cartridge
The directions below show how I made each letter for the Cricut family sign:
1. For the "F" of FAMILY: Storybook Cartridge,
choose the letter "F" (button 24), cut at 3.5 inches. Then, I
also cut a "shadow" of the letter. This was done by hitting
the "repeat last" button and pressing down the "shadow" button, then
pressing "cut".
2. For the "A" of FAMILY: Storybook Cartridge,
pressed the "Fancy/Corner" button, then selected the letter "A" (button
21). Selected size 2.75 inches, then pressed "cut".
3. For the "M" of FAMILY: Plantin SchoolBook
cartridge, pressed the "Tall Ball" button, choose the letter "M"
(button 37), at size 2.5 inches, and cut. I was not able to
cut a shadow of the letter using this special feature, but instead cut
one out free-hand (Glue the letter to background paper then cut around
the letter).
4. For the "I" of FAMILY: Plantin SchoolBook
cartridge, choose the letter "I" (button 18), selected size 2.5 inches,
and cut. Then I went back and created a shadow of the letter
by hitting "repeat last" button and selecting the "shadow"' button,
then pressing "cut".
5. For the "L" of FAMILY: Alphalicious Cartridge,
choose the letter "L" (button 29), selected size 2.75 inches, and cut.
Then I went back and created a shadow of the letter
by hitting "repeat last" button and selecting the "shadow"' button,
then pressing "cut".
6. For the "Y" of FAMILY: Calligraphy Collection
Cartridge: Selected the "Matrimony button", then pressed the
letter "Y" (button 16), selected size 4.25 inches, and cut.
7. For the "God Bless Your" I choose the Calligraphy
Collection Cartridge. I selected the "Matrimony" button,
entered my letters, and cut at size 1.5 inches.
8. Now take your time and assemble all your letters, by
gluing them to their shadows, inking the edges if desired, etc.
Glue them to an appropriate background of your choice and
embellish. Note: Some of the letters are quite thin,
especially the "God Bless Your" cut at only 1.5 inches. To
glue these, I love using the fine tipped ZIG glue pen. You
can find these at craft stores near the scrapbooking, and even Wal-Mart
carries them. You cannot use a thick glue stick on letters
this thin. I would LOVE to see your version of this Cricut family sign!
Please post pictures, add comments, or ask questions using the form
below.
Would you consider a small donation?
You will receive my craft ebook as a thank you!
Every little bit helps! If you are enjoying this site, would you consider making a small donation? I use the extra money to help with the cost of craft supplies! With any $5.00 donation or more, you will receive my 650 page ebook full of 178 craft tutorials from this site. Thank you for your consideration!
Click here to learn more about the book, and to make a donation.


