Hemp Jewelry
How to Make a Hemp Necklace
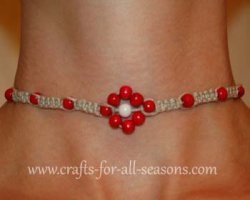
This hemp jewelry craft can be worn as a choker or a bracelet. To make a bracelet, simply braid less length for the first and second step.
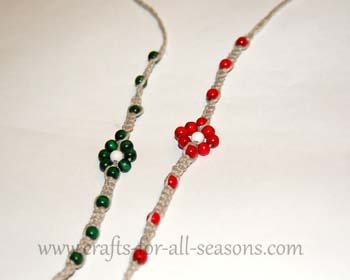
I love the earthy, nature loving look of hemp jewelry, just perfect for Summer or everyday wear. Try making several and grouping them together as bracelets on your wrists.
Hemp cording can be found in the jewelry aisle at your local craft store.
This necklace is very simple to make because you only need to learn how to do one type of knot, the square knot. Once you know the knotting pattern, you can turn hemp cord into many different things... like keychains, bookmarks, zipper pulls, etc.
All the step by step directions are described below.
Materials Needed:
- 2 and 2/3 yards of 1 mm hemp cord (natural color)
- 14 round wood beads in color of choice (below I used 6 mm diameter red beads in the step by step photos)
- 1 white or yellow round wood bead (6 mm) for the center of the flower.
- Clipboard (or knotting board with T pins if you prefer)
- Scissors
Instructions for Hemp Jewelry
1. Cut two pieces of hemp each 1 yard long, and cut a third length 2 feet long. 2. Tie the three pieces of cord together using a simple overhand knot, close to the end. Place the knot under the clip of clipboard. I find this to be a very useful way to keep your work in place while tying the knots. Or, you can purchase a knotting board specifically for this purpose at your local craft store.
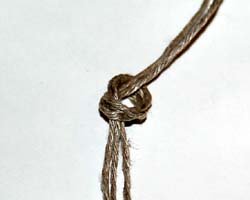
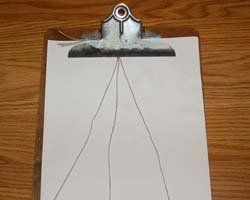
3. Braid the three pieces of cord for about four inches. End the braid
with the shorter cord in the middle.
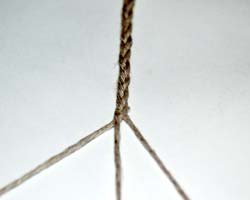
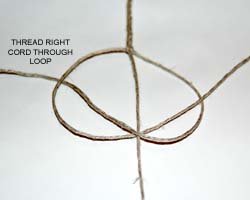
4. Next you
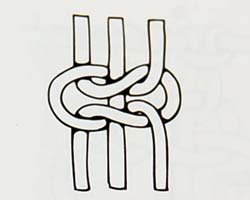
want to tie one square knot to end the braid. Follow the
diagram and photos below which walk you through how to make this square
knot. The square knot takes two steps. The first thing to do is take
the longer cord on the right and pull it UNDER the center cord, and
OVER the left cord. Always remember "under, over". Next, take the cord
on the left and thread it through the loop you created. Pull this knot
up tight, pulling the center cord (filler cord) tight. For the second
step, you repeat this, but this time start with the left cord. Bring
the left cord UNDER the center cord, and OVER the right cord. Then
thread the right cord through the loop and tighten. You have just made
a square knot.
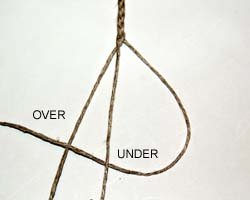
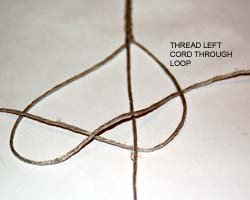
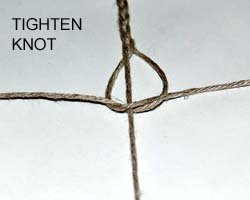
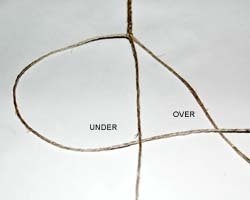
6. Thread a colored bead on to the center cord.
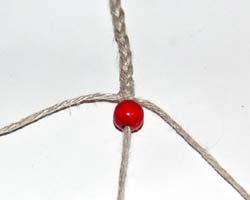
7. Tie four square knots under the bead. The photo below shows the
first knot beginning underneath the bead.
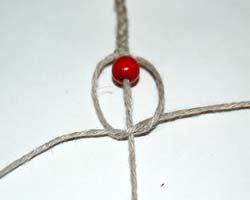
8. Thread on another colored bead, and repeat with four square knots.
9. Repeat step 7 once again.
10. Thread on another colored bead.
11. Make a half square knot under this bead. This is done by just following the first step of making a square knot.
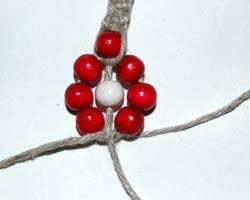
12. Thread on a white bead on the center cord. On the left and right cords, thread on three colored beads each.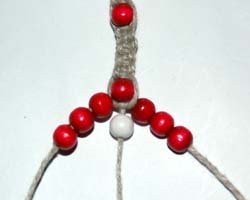
13. Bring the cords back together and make a
half knot. This is the
center of the choker and forms the flower.
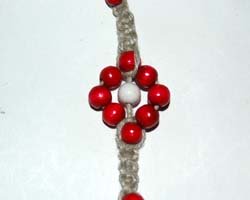
14. Thread on another colored bead, and begin the sequence again (four
square knots, bead, four square knots, bead, four square knots, bead,
one square knot, and braid and end with overhand knot.)
15. To wear your necklace, tie the cords around your neck or wrist in a knot.
Would you consider a small donation?
You will receive my craft ebook as a thank you!
Every little bit helps! If you are enjoying this site, would you consider making a small donation? I use the extra money to help with the cost of craft supplies! With any $5.00 donation or more, you will receive my 650 page ebook full of 178 craft tutorials from this site. Thank you for your consideration!
Click here to learn more about the book, and to make a donation.
Home › Summer Crafts › Hemp Jewelry
Home › Crafts for Teens › Hemp Jewelry
Home › Crafts for Adults › Hemp Jewelry
Home › All Occasion Crafts › Hemp Jewelry


Facebook Comments
Have Your Say About What You Just Read! Leave Your Comments or Questions Below.