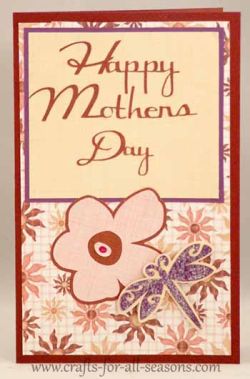
Cricut Mother's Day Card
Cricut Card Making Projects
I made this Cricut Mother's Day card using the Stamping Solutions cartridge.
This project also includes a Design Studio cut file for the words "Happy Mother's Day", using the Lyrical Letters cartridge
Things Needed to Make this Cricut Mother's Day Card:
- Stamping Solutions Cartridge for flower and dragonfly
- Lyrical Letters Cartridge
for the words "Happy Mother's Day" (includes
cut file)
- 8.5" x 11" cardstock for card base
- Patterned or solid color paper for the background on front of card
- Scraps of solid cardstock for title background, words, dragonfly, and flower.
- Glue and glitter for the dragonfly (optional)
- Glitter glue for the center of the flower (optional)
- Paper trimmer and or scissors
- Glue stick or pen (for intricate designs I use a fine-tipped Zig pen)
Quick Summary for Cricut Mother's Day Card:
Stamping Solutions:
- Card is 8.5" x 5.5"
- Flower cut at 3"
- Dragonfly cut at 2"
Lyrical Letters cut file is used for "Happy Mother's Day"
Detailed Instructions to Make the Cricut Mother's Day Card:
1. Fold a 8.5" x 11" of cardstock
in half to create a 8.5" x 5.5" card. This will be the card
base.
2. Cut a patterned sheet of paper 5"
x 8" and glue it on top of the front of the card.
3.
Cut two pieces of cardstock to make the rectangle where the
words
"Happy Mother's Day" appears. The bigger rectangle is 4 1/4"
by 4 3/4".
The smaller rectangle is 4" x 4 1/2".
Glue these on top of one another, and then to the top portion
of the front of the card.
4.
I used the Cricut Design Studio and Lyrical Letters to cut
out "Happy Mother's Day". It was cut using the feature
"connected" and I used the software to kern and weld the letters
together. The title ends up being 4" long by 3.5" tall.
If you own Cricut Design Studio and the Lyrical Letters
cartridge and would like to download the cut file, please click here
(you will need to unzip the file). If this is not working for
you, please let me know by contacting me so I can fix any
problems.
5.
Load the Stamping Solutions cartridge.
Using the color cardstock of your choice, select "shift" then
the
"please come" button (button 20) to select the flower. Select
3".
Press "cut".
6. Load in a
contrasting color and
select "repeat last" and then also hit "shadow". Select
"cut".
This will make a flower with a slightly bigger shape for the
background. Glue the smaller flower on top of the big one.
I also enhanced the middle of the flower with a dot of
glitter
glue.
7. For the dragonfly, load in the
color of your
choice (I used purple). Select "shift" then "missing you"
(button
3). Select size 2". Press "cut". Then
load the color
for the background, and select "repeat last" then select "shadow".
Press "cut". Before gluing the dragonfly to the
background,
I first applied glue to the purple dragonfly and sprinkled it with
glitter for extra sparkle. After it was dry I glued the dragonfly to
its shadow. The dragonfly was then glued below but
overlapping
the flower.
Would you consider a small donation?
You will receive my craft ebook as a thank you!
Every little bit helps! If you are enjoying this site, would you consider making a small donation? I use the extra money to help with the cost of craft supplies! With any $5.00 donation or more, you will receive my 650 page ebook full of 178 craft tutorials from this site. Thank you for your consideration!
Click here to learn more about the book, and to make a donation.


