Easter Cross Craft
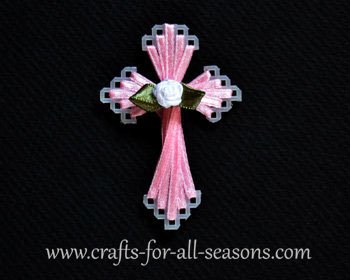
This little Easter cross craft is made with some ribbon and a small square of plastic canvas sheet. It is a pretty easy pattern to master once you get the hang of it, so this project is suitable for older children and seniors who still can master threading through the holes.
I have included a video tutorial of the technique, because some learn
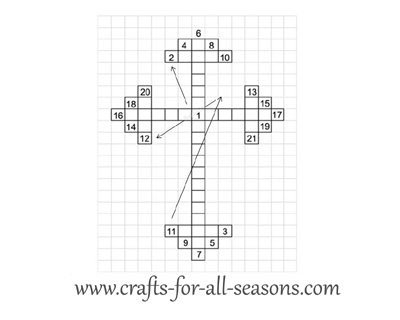
better by watching. You will need to download the pattern
included in
the directions below. This pattern has holes that are
numbered, so you
will know which hole to thread and in what order.
This cross craft is
a unique religious craft and works well as a Sunday School craft.
And
while it is pretty on its own, you can make this into many
different
things! Here are a few ideas:
Make it into a Pin: Sew a pin backing to the
back of the
cross. This would look beautiful on your coat or bag for
Easter!
Make it into a Necklace: Use more of the same ribbon to create a necklace, simply thread the ribbon under the top loop at the top of the cross.
Make it into a Magnet: Use a strong glue and attach a
button magnet to
the back, to display all year long.
Make
it into a Bookmark: Add a thick length of ribbon
to the
cross. The
ribbon can go into the book pages, with the cross dangling on the
outside.
Make it into a Car Mirror Decoration: Add a
ribbon and hang
this cross from your car rearview mirror to remind the angels to watch
over you!
Make it into a Bible Cover Embellishment: Glue
this cross to
your felt or fabric Bible cover.
Make it into an Ornament: You can make these with red or
green ribbon
to make it a Christmas tree ornament.
Make an Easter
Card: Glue this cross to the front of a homemade
Easter card.
Materials Needed for this Cross Craft:
- Plastic canvas sheet (7 holes per inch)
- 1/8" wide ribbon in your color of choice
- Cross Pattern (download by clicking the link)
- Washable marker
- Scissor
- Small rose embellishment (optional)
Instructions for the Easter Cross Craft:
1. Begin the cross craft by downloading the cross pattern here, and print it off. This is a PDF file (a new window will open).

2. Next, watch this video. If you still have questions, you can read more specific step by step directions below.
3. Using the washable marker, draw the cross pattern on the plastic canvas sheet, by following the pattern you printed off. Just count and keep track of the squares. Then, cut out your cross. Wipe off the washable marker with a wet tissue.

4. Measure out approximately three and a half to four feet of the 1/8" ribbon.
You can cut this off of the spool, or leave it on, which ever
you prefer. To make the ribbon easier to thread you may like
to use a large needle, or reinforce the end of the ribbon with scotch
tape to stop fraying.
5. Starting from behind the cross, thread the ribbon up
through the middle hole of the cross (square 1 on the pattern).
Bring the ribbon all the way through, leaving about a two
inch tail.
6. Next, bring the ribbon up to square 2 on the pattern, and
thread it down through this hole. Bring the ribbon behind the
cross, and go up through hole 3. Continue working this way,
following the numbers. Keep the ribbon nice and straight and
be sure it does not get twisted.
7. When you get halfway through, you will bring the ribbon up
and over the right side arm of the cross, and begin threading up
through hole 12 on the left side of the arm.
8. Continue threading, following the rest of the numbers.
When you get to the end, secure the ribbon by wrapping it
diagonally, twice around the center of the cross. You will be
making an "X", and this tightens up the cross and keeps everything
secure.
9. Tie the ribbon ends together in the back to secure.
Add a small rose embellishment if you like!
Would you consider a small donation?
You will receive my craft ebook as a thank you!
Every little bit helps! If you are enjoying this site, would you consider making a small donation? I use the extra money to help with the cost of craft supplies! With any $5.00 donation or more, you will receive my 650 page ebook full of 178 craft tutorials from this site. Thank you for your consideration!
Click here to learn more about the book, and to make a donation.


