Handprint Valentines
These handprint Valentines will mean so much and will be cherished for years. Nothing says “I love you” better than a homemade Valentine.
This is a perfect project for a child to do at school, to make Valentine’s for their parents. They look beautiful with an adult’s handprint as well. The inside is open to your creativity. If you need help on what to say on the inside, check out the link on Valentine’s Verses and Sayings on the Valentine’s Crafts Page. Finger paints tend to work better than acrylics because the paint stays wet a little longer on your hands. For the project shown below, I used acrylic paints.
Materials Needed:
- Red and/or white card stock
- Finger paints, Poster Paints, or Acrylic Paints in red and/or white
- A paper paint, or other dish to put the paint in
- Red or white yarn
- Glitter Glue
- Scissors (fancy edged ones are nice too)
Instructions for Handprint Valentines
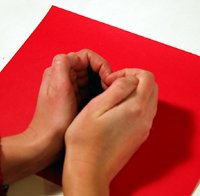
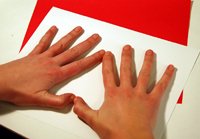
1. Begin the handprint Valentines by placing some paint in the paper
plate and have your card stock you want to stamp on ready. Then, dip
your hands in the paint. See the diagrams below which shows you the
hand placement needed to achieve the design. You may need to practice a
little, or do a few of them until you find a heart design you are happy
with.


2. Once you have your designs stamped, set them aside to dry and go wash your hands.
3. When the designs are dry, you can add glitter glue to them to accentuate the heart. When the glue is dry, cut out the excess paper around them (called “cropping”). Fancy edged scissors make a nice touch but it is not necessary.


4. Mat your design on a the opposite colored card stock. If you stamped
on white, glue the white design on the red, and vice versa. If you used
your whole hands to make the heart, the design is probably quite big
and takes up most of the paper. To make this into a big card, add
another piece of red card stock behind it. The next step explains how to
attach the paper together. If you used the sides of your hands for the
small heart, you will probably have room to mat this design on a
rectangular piece of card stock that can be folded into a card.

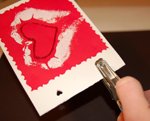
5. To attach the two pieces of paper together for the big card, you will punch two holes through both sheets. Then, you can thread yarn through the two holes to hold the two sheets together. This can be done to the smaller card as well, for a decorative element. To do this, measure along the edge you want to tie with yarn. Mark two dots, each about 1 inch in from the outer edges. Punch out these two holes with a paper punch.

6. Thread some yarn through the holes and tie in a bow. This will allow the big card to flip open.
7. The inside of your valentines are open for your thoughts and creativity.


Would you consider a small donation?
You will receive my craft ebook as a thank you!
Every little bit helps! If you are enjoying this site, would you consider making a small donation? I use the extra money to help with the cost of craft supplies! With any $5.00 donation or more, you will receive my 650 page ebook full of 178 craft tutorials from this site. Thank you for your consideration!
Click here to learn more about the book, and to make a donation.
Home › Handprint Crafts › Handprint Valentines
Home › Valentine's Day Crafts › Handprint Valentines
Home › Crafts for School Age Kids › Handprint Valentines
Home › Crafts for Preschoolers › Handprint Valentines
Home › Crafts for Toddlers › Handprint Valentines


