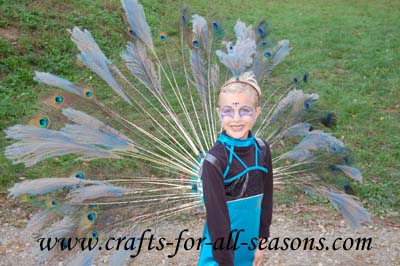
Homemade Peacock Costume
Homemade Halloween Costumes
I made this homemade peacock costume for my daughter last Halloween. Below I explain exactly how I put the tail together, and how I made it come apart for easy storage.
I was lucky enough to find the blue shiny dress she is wearing at a thrift shop. It was obvious that it used to be a dress that a young dancer wore for a recital. Because I found the dress, I didn't have to worry about the peacock's body. However, if you dress your little one (or yourself) in a blue, green, purple, or black top, skirt, or pants that would do the trick, because the main part of the costume is the huge tail!
The peacock feathers were purchased from Joann.com and they were actually quite reasonable. I got three packs (about $24 total) of the feathers and still have many left over. I have made other crafts with the leftover feathers, such as the peacock feather earrings.
This entire homemade peacock costume cost me about $30 to make.
Materials Needed to Make the Peacock Costume:
- About 30 peacock feathers, approximately 3 packages of 12, available here: Peacock Eye Feathers-12PK/Natural
- Piece of cardboard
- Piece of Styrofoam
- Duct tape
- Clear packing tape
- blue or purple spray paint
- Feather plumes from some ornamental lawn grass
Instructions for the Homemade Peacock Costume
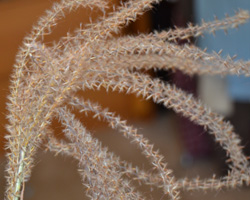
1. Begin the homemade peacock costume by gathering some feather plumes
from some ornamental lawn grass. During late summer/early
fall, most varieties of ornamental lawn grasses grow out some large
feathery plumes. If you don't have any in your yard, ask a
neighbor if you could cut some off their plant. These
feathery plumes will help fill in the tail and give it more fullness.
I spray painted the ends of these plumes blue.
You could also use green or purple spray paint too.
Do this outside with plenty of ventilation.
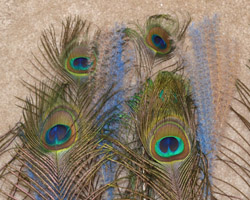
2. Next, open up the packages of peacock feathers and fan them out in a
half circle, spacing them out evenly. Behind them, lay out
your spray painted feather plumes. Arrange them how you want
the tail to look.
3. To make the base that will hold the tail feathers, cut out a half
circle from the cardboard. It should measure about one foot
across.
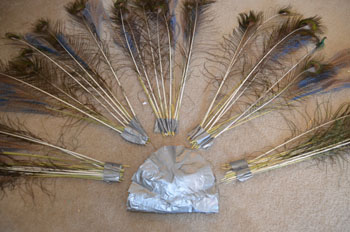
4. To make the tail be easy to transport and to store year
after year, I created the tail so that it could be taken apart in
sections. I visually divided the tail feathers up into five
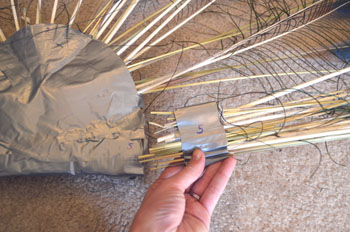
groups, then took one group and secured the base of the feathers with
duct tape. I left them fanned out, and I didn't tape them
tightly
in a bunch. Instead, I laid the tape over the base of the
feathers while they were spread to keep them separated slightly.
Do this with all five sections (or as many as you choose) as
shown below:
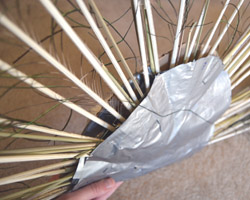
5. On the base of the cardboard half circle, I created little pockets
that each group of feathers would fit in to. This was done
using duct tape. Duct tape is so handy, and I love its
versatality. You can make so many things with it.
To create the pockets, I created small sections
of duct tape that were not sticky. This is done by pressing
two sticky
sides of duct tape together. The sides and bottoms of these
little sections were then taped down (using more duct tape of course)
to the semi-circle. Here's a top view of what each pocket
looked like, and how the feather sections fit right in.
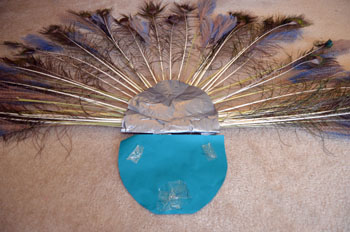
6. To cover up all that silver duct tape, I cut a semi-circle of aqua
cardstock and taped it right over the duct tape
semi-circle.
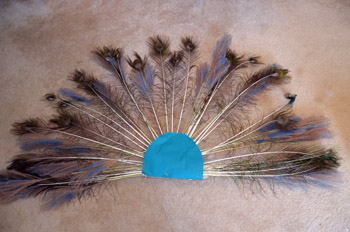
7. I found that
when my daughter had the tail on, it needed a bit of space (a spacer)
between the tail and her back so the feathers would not to be touching
the
back of my daughter's head. I had a piece of scrap Styrofoam
about two inches thick, which I taped to the inside of the semi-circle.
This spacer was just perfect.
If you don't have a piece of Styrofoam you can get creative
and use
anything that may work. You can even use an old t-shirt or
towel.
Just fold it up to give it some thickness and duct tape it
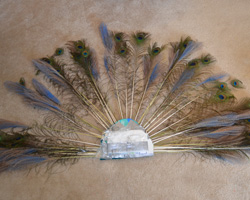
inside the base of the tail. The photo below shows the wrong
side of the tail (the side that will be facing your back).
The white base is the Styrofoam I duct taped on.
7. To hold the tail in place, you will need to make some
clear straps that are attached to the base of the tail, and run up and
over the person's shoulders (like a backpack). I made these
straps using clear packing tape. Create the straps by
applying
the sticky sides of clear packing tape together, so you have a strong,
clear strap that is not sticky. Then, you can attach the ends
of these straps with more duct tape to the base of the tail.
Extra notes about the homemade peacock costume:
- When my daughter put on the tail, I taped it on her even better with clear packing tape. I also secured the clear shoulder straps to the base of the tail while she had it on.
- If some of the feathers were not fanned out perfectly (if there were spaces between the sections of feathers) I would take two of the feathers that were gapped and tape them together near the base while she had the costume on.
-
I made her a headband for her hair with an additional feather plume.
- I added face makeup to her eyes.
- When Halloween is over, this homemade peacock costume can be easily stored because each section of the tail slides out of the base easily. I store them in the box that the peacock feathers from Joann.com were delivered in.
Would you consider a small donation?
You will receive my craft ebook as a thank you!
Every little bit helps! If you are enjoying this site, would you consider making a small donation? I use the extra money to help with the cost of craft supplies! With any $5.00 donation or more, you will receive my 650 page ebook full of 178 craft tutorials from this site. Thank you for your consideration!
Click here to learn more about the book, and to make a donation.
