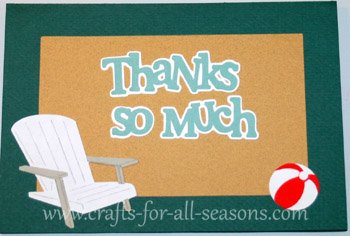
Life is a Beach Card
Cricut Card Making Projects
This Life is a Beach card was made on my Cricut and given to my parents as a thank you, for allowing us to stay in their beach house.
It is a very simple design, but it shows some of the cute ocean designs that come with the Life is a Beach cartridge. The card is 7" wide.
For something a bit different, you can use a small piece of sandpaper as the background of the window to resemble the beach. You can make your own sandpaper too with a bit of spray glue and some sand.
Things Needed to Make this Life is a Beach Card:
- Life is a Beach Cartridge
- One 8.5" x 11" sheet of teal or blue cardstock (for card base)
- One 7" x 5" sheet of cardstock in a tan color for the inner background to resemble sand. You could also use sand paper, or glue sand to some regular paper.
- White, red, gray and light blue paper scraps for the elements of the card
- Paper trimmer with scoring tool, and/or bone folder
- Glue stick or pen (for intricate designs I use a fine-tipped Zig pen)
Quick Summary:
Life is a Beach:
- Beach chair photo card cut at 7"
- Beach chair cut at 2.5"
- Beach ball cut at 1"
Stamping
Solutions:
- "Thanks So Much" cut at 1 3/4"
Detailed Instructions for the Life is a Beach Card
1. To make the Life is a Beach
card, load the 8.5" x 11" teal or blue cardstock. Select the
beach chair (button 50). Select "photo card" (button option of the
left). Select size 7". Hit
"Cut". You will also get an extra beach chair cut out in the
center; you can save this for another use.
2. Cut a piece of sand colored paper with a paper trimmer, to
create a slightly smaller rectangle than the outside border of the
card. This can be glued to the inside of the card, in the
upper part. This creates a background for the front of the
card.
3. Load a scrap of white paper.
Select the beach chair (button 50). Select
size 2.5". Hit "cut". Do not unload paper.
Next, select the beach ball by
hitting "shift", then the "beach chair" button again (button
50). Select size 1". Glue the beach chair
on top of the chair that was cut when you made the border of the card.
Glue the white beach ball in the other corner of the card, as
shown.
4. For the beach chair layers, load
a scrap of gray paper. Select the beach chair (button 50);
then "layers". Select size 2.5". Press "cut".
5.
For the beach ball layers, load a scrap of red paper.
Press "shift" then the beach chair button (button 50); then
select the "layers" button. Select size 1". Press
"cut". Glue these on top of the beach ball.
6.
The "Thanks So Much" was cut using the Stamping Solutions
Cartridge. Select "thanks so much" (button 29) and select
size 1 3/4".
Hit "cut". The for the shadow, load a contrasting
shade of paper. Select the "shadow button", then "thanks so
much" button once again. Keep this at size 1 3/4"
as before. Select "cut". Glue the shadow first to
the tan cardstock, then the smaller font on top of it.
Would you consider a small donation?
You will receive my craft ebook as a thank you!
Every little bit helps! If you are enjoying this site, would you consider making a small donation? I use the extra money to help with the cost of craft supplies! With any $5.00 donation or more, you will receive my 650 page ebook full of 178 craft tutorials from this site. Thank you for your consideration!
Click here to learn more about the book, and to make a donation.


