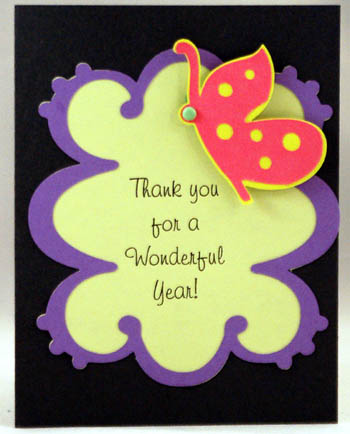
Teacher Thank You Card
Cricut Teacher Card
I gave this teacher thank you card to my daughter's teacher at the end of the year, to show how much we appreciate her.
I love making Cricut teacher cards, since I can cut multiples at once. These teacher cards were made using the Storybook cartridge.
Materials Needed:
- Storybook Cartridge
- 8.5" x 5.5" black card stock for card base (one 8.5" x 11" sheet will make two cards)
- Dark purple card stock
- Light green card stock
- Scrap of pink card stock
- Scrap of yellow card stock
- Light green or blue brad for the butterfly eye
- Computer with a printer to print "thank you for a wonderful year"
- 3D foam squares to adhere the butterfly (optional, but adds dimension)
- Paper trimmer and or scissors
- Glue stick or pen (for intricate designs I use a fine-tipped Zig pen)
Quick Summary for this Teacher Thank You Card:
- Card is 4.25" x 5.5" (quarter fold card)
Storybook:
- Scroll and its background is cut at 4.25"
- Butterfly and shadow is cut at 2.25"
Detailed Instructions for Making this Teacher Thank You Card
1. Fold a 8.5" x 5.5" piece of black card stock in half to create a 4.25" x 5.5" card.
2. To get the wording on the card, you may want to use your printer like I did. If you choose this method, print the saying out of the paper first, somewhere not to close to the edge of paper. Next, you will cut a frame around the wording using your Cricut. Or, you may decide to add on a saying using a rubber stamp, letter stickers, choose to write it in your own handwriting. If you do this option, you can add the saying AFTER you cut the frame. I chose to print on my cards, "Thanks for a Wonderful Year".
3. Load the green paper with the wording on it on to a Cricut cutting mat. Using the Storybook cartridge, select the background frame by selecting "shift", and the number "6" button (button 6). Next, choose the "accent/blackout" special feature option. Next, use the center point option if you already have your wording on the paper. To do this, move the cutting blade directly over the center of the words. Select the center point button until it is highlighted and cut at size 4.25".
4. Load the purple paper on to a mat. Select the frame by pressing "shift", the number "6" button (button 6) and the "accent/frame" special feature option. Cut at size 4.25". Assemble the card by gluing all the components on the front of the card.
5. Load scraps of pink and yellow on to the mat. Align the blade to cut on the yellow paper. Select "shift", then the letter "C" button (button 33), then press the "shadow" special feature button. This should select the butterfly. Cut at size 2.25".
6. Next, align the blade to cut on the pink paper. Select "shift", then the letter "C" button (button 33), then press the "shorty/holes" special feature button. This should select the butterfly with spots. Cut at size 2.25".
7. If desired, add a brad where the butterfly eye should be. After it is attached, glue the butterfly to its shadow. Then attach the butterfly to the top of the frame using 3D foam stickers to make it pop off the page and have some dimension.
Would you consider a small donation?
You will receive my craft ebook as a thank you!
Every little bit helps! If you are enjoying this site, would you consider making a small donation? I use the extra money to help with the cost of craft supplies! With any $5.00 donation or more, you will receive my 650 page ebook full of 178 craft tutorials from this site. Thank you for your consideration!
Click here to learn more about the book, and to make a donation.
Home › Cricut Craft Projects › Teacher Thank You Card


