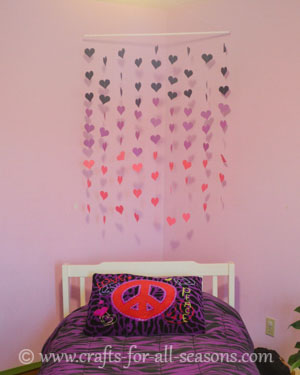
Teen Room Decoration
Paper Hearts Mobile
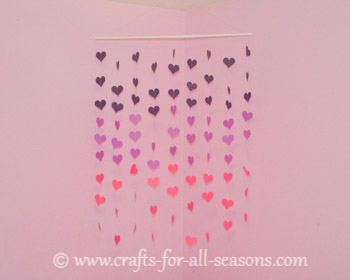
This beautiful DIY girl teen room decoration is easy to make and adds personal style to any bedroom. It is make out of paper, and you can use any shape or any combination of colors to make this totally unique to you! It is CHEAP to make and EASY too! I'll show you how.
I have a Cricut die-cutter machine, which made it very easy to cut out all these hearts from paper. But don't worry if you do not have a Cricut. Shapes can be cut using a Swizzix, or any of the paper punches that are available today (check out the scrapbooking aisle at your local craft store... so many options!). You could also cut out your shapes by hand, There are so many paper punches available these days, if you bought one you could cut out many of these shapes very quickly.
You can make this any size that you like. I give the dimensions of
mine, but keep in mind that you can make this as wide (or as tall) as
you like!
Materials Needed:
- Wooden dowel (mine was 3 feet long)
- Paint and paintbrush (if you want to paint your dowel)
- White thread and needle
- Colored card stock in the colors of your choice (I chose pink, light purple, and dark purple)
- Cricut die-cutter with ability to cut a heart, or a large heart paper punch
- Scissors
Instructions for the Teen Room Decoration
1. Begin by painting your wooden dowel (optional). I chose white. Allow it to dry.
2. Next, plan out your colors and the shape you wish to cut. Things
that would look great are hearts, stars, circles, squares, peace signs,
etc. Remember, if you do not have a Cricut you could also cut shapes by
hand or use a large paper punch. For my paper hearts, I cut out 27 hearts of
each color (pink, light purple, and dark purple) and each were 2.5
inches tall.


3. The rest of this project is easiest to complete while the dowel is hanging. Tie a long piece of thread to either end of the dowel. You will have to experiment with the length, to get the right look you want. The longer the thread, the lower it will hang from the ceiling. In the middle of the string, take a small square of card stock and wrap it around the string. This gives you an anchor to screw through to the ceiling. It also keeps the mobile from spinning.
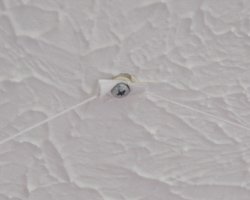
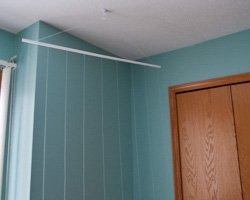
4. Next, tie equal lengths of thread to the dowel in equal distances. For my project, I tied 9 pieces of thread that were four inches apart on the dowel. The threads extended about four feet.
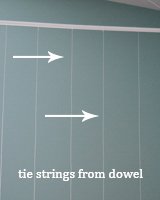
5. Now you can begin threading on your hearts. Thread a needle on the end of the one of the hanging threads. Beginning with the color you want to be at the top, begin "sewing" on the hearts by making one simple stitch near the top of each heart.

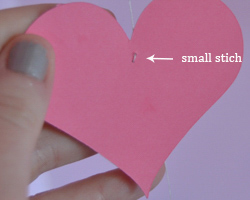
6. Continue sewing on all the hearts. I added three hearts of each color, for 9 total on each thread. Continue with the other threads.

7. To finish, spread each heart equally apart down the length of the thread, by gently pulling each heart. I found it looked best when I staggered the hearts on the next thread over, so that each heart would lie between two hearts on the next thread over (refer to the photos for help). Tie a small knot at the bottom of each thread.

Would you consider a small donation?
You will receive my craft ebook as a thank you!
Every little bit helps! If you are enjoying this site, would you consider making a small donation? I use the extra money to help with the cost of craft supplies! With any $5.00 donation or more, you will receive my 650 page ebook full of 178 craft tutorials from this site. Thank you for your consideration!
Click here to learn more about the book, and to make a donation.
Home › Crafts for Teens › Teen Room Decoration
Home › Crafts for Adults › Teen Room Decoration
Home › All Occasion Crafts › Teen Room Decoration
Home › Cricut Projects › Teen Room Decoration
Home › Valentine's Day Crafts › Teen Room Decoration
